
documentation_tutorial.markdown 23 KB
Writing documentation for OpenCV {#tutorial_documentation}
@prev_tutorial{tutorial_display_image} @next_tutorial{tutorial_transition_guide}
| | | | -: | :- | | Original author | Maksim Shabunin | | Compatibility | OpenCV >= 3.0 |
Doxygen overview {#tutorial_documentation_overview}
Intro {#tutorial_documentation_intro}
Doxygen is documentation generation system with a lot of great features, such as:
- parse program sources to produce actual and accurate documentation
- check documentation for errors
- insert images and formulas
- use markdown syntax and plain HTML for precise text formatting
- generate documentation in many different formats
OpenCV library existing documentation has been converted to doxygen format.
Installation {#tutorial_documentation_install}
Please, check official download and installation pages. Some linux distributions can also provide doxygen packages.
Generate documentation {#tutorial_documentation_generate}
- Get the OpenCV sources (version 3.0 and later)
- Optional: get the OpenCV_contrib sources
- Create build directory near the sources folder(s) and go into it
- Run cmake (assuming you put sources to opencv folder): @code{.sh} cmake -DBUILD_DOCS=ON ../opencv @endcode Or if you get contrib sources too: @code{.sh} cmake -DBUILD_DOCS=ON -DOPENCV_EXTRA_MODULES_PATH=../opencv_contrib/modules ../opencv @endcode
- Run make: @code{.sh} make doxygen @endcode
- Open doc/doxygen/html/index.html file in your favorite browser
- Test your Python code: @code{.sh} make check_pylint @endcode @note Pylint must be installed before running cmake to be able to test Python code. You can install using your system's package manager, or with pip: @code{.sh} pip install pylint @endcode
Quick start {#tutorial_documentation_quick_start}
@note These instructions are specific to OpenCV library documentation, other projects can use different layout scheme and documenting agreements.
Documentation locations {#tutorial_documentation_quick_start_1}
Whole documentation is gathered from many different places:
source code entities, like classes, functions or enumerations, should be documented in corresponding header files, right prior entity definition. See examples in next sections.
pages are good place to put big pieces of text with images and code examples not directly connected with any source code entity. Pages should be located in separate files and contained in several predefined places. This tutorial is example of such page.
images can be used to illustrate described things. Usually located at the same places as pages, images can be inserted to any place of the documentation.
code examples show how to use the library in real applications. Each sample is self-contained file which represents one simple application. Parts of these files can be included into documentation and tutorials to demonstrate function calls and objects collaboration.
BibTeX references are used to create one common bibliography. All science books, articles and proceedings served as basis for library functionality should be put in this reference list.
Following scheme represents common documentation places for opencv repository:
<opencv>
├── doc             - doxygen config files, root page (root.markdown.in), BibTeX file (opencv.bib)
│   ├── tutorials       - tutorials hierarchy (pages and images)
│   └── py_tutorials    - python tutorials hierarchy (pages and images)
├── modules
│   └── <modulename>
│       ├── doc         - documentation pages and images for module
│       └── include     - code documentation in header files
└── samples         - place for all code examples
    ├── cpp
    │   └── tutorial_code   - place for tutorial code examples
    └── ...
@note Automatic code parser looks for all header files (".h, .hpp" except for ".inl.hpp; .impl.hpp; _detail.hpp") in include folder and its subfolders. Some module-specific instructions (group definitions) and documentation should be put into "include/opencv2/.hpp" file.
@note You can put C++ template implementation and specialization to separate files (".impl.hpp") ignored by doxygen.
@note Files in src subfolder are not parsed, because documentation is intended mostly for the library users, not developers. But it still is possible to generate full documentation by customizing processed files list in cmake script (doc/CMakeLists.txt) and doxygen options in its configuration file (doc/Doxyfile.in).
Since version 3.0 all new modules are placed into _opencvcontrib repository, it has slightly different layout:
<opencv_contrib>
└── modules
    └── <modulename>
        ├── doc         - documentation pages and images, BibTeX file (<modulename>.bib)
        ├── include     - code documentation in header files
        ├── samples     - place for code examples for documentation and tutorials
        └── tutorials   - tutorial pages and images
Example {#tutorial_documentation_quick_start_2}
To add documentation for functions, classes and other entities, just insert special comment prior its definition. Like this:
@verbatim /** @brief Calculates the exponent of every array element.
The function exp calculates the exponent of every element of the input array: \f[ \texttt{dst} [I] = e^{ src(I) } \f]
The maximum relative error is about 7e-6 for single-precision input and less than 1e-10 for double-precision input. Currently, the function converts denormalized values to zeros on output. Special values (NaN, Inf) are not handled.
@param src input array. @param dst output array of the same size and type as src.
@sa log , cartToPolar , polarToCart , phase , pow , sqrt , magnitude */ CV_EXPORTS_W void exp(InputArray src, OutputArray dst); @endverbatim
Here you can see:
special C-comment syntax denotes it is doxygen comment @verbatim /** ... */ @endverbatim
command
briefdenotes following paragraph is a brief description @verbatim @brief @endverbatimempty line denotes paragraph end
TeX formula between
f[andf]commands @verbatim \f[ ... \f] @endverbatimcommand
paramdenotes following word is name of the parameter and following text is description of the parameter; all parameters are placed in a list @verbatim @param @endverbatimcommand
sastarts "See also" paragraph containing references to some classes, methods, pages or URLs. @verbatim @sa @endverbatim
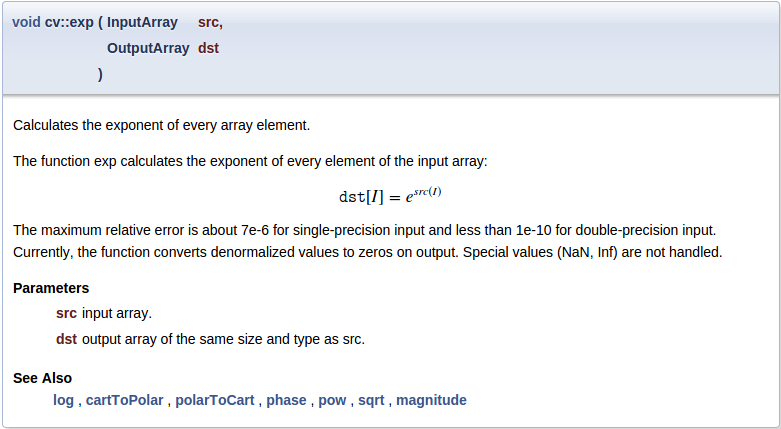
Produced reference item looks like this:

The "More..." link brings you to the function documentation:
Another example {#tutorial_documentation_quick_start_3}
Different comment syntax can be used for one-line short comments:
@verbatim //! type of line enum LineTypes {
FILLED  = -1,
LINE_4  = 4, //!< 4-connected line
LINE_8  = 8, //!< 8-connected line
LINE_AA = 16 //!< antialiased line
}; @endverbatim
Here:
special C++-comment syntax denotes it is doxygen comment @verbatim //! @endverbatim
additional symbol
<denotes this comment is located after documented entity @verbatim //!< @endverbatim
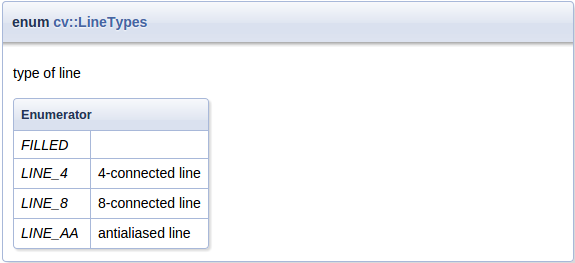
Produced documentation block looks like this:
More details {#tutorial_documentation_quick_start_4}
Command prefix
Doxygen commands starts with @ or \ sign:
@verbatim
@brief ...
or
\brief ...
@endverbatim
Comment syntax
Doxygen comment can have different forms: @verbatim C-style: /** ... / or /! ... */
C++-style //! ... or /// ...
Lines can start with '*': /**
- ...
- ... */
Can be placed after documented entity: //!< ... /**< ... */ @endverbatim
Paragraph end
To end paragraph, insert empty line or any command starting new paragraph: @verbatim @brief brief description paragraph brief continues
new paragraph
@note new note paragraph note paragraph continues
another paragraph paragraph continues @endverbatim
Naming
Pages, anchors, groups and other named entities should have unique name inside the whole project. It is a good idea to prefix such identifiers with module name: @verbatim @page core_explanation_1 Usage explanation @defgroup imgproc_transform Image transformations @anchor mymodule_interesting_note @endverbatim
Supported Markdown {#tutorial_documentation_quick_start_md}
Doxygen supports Markdown formatting with some extensions. Short syntax reference is described below, for details visit Markdown support.
lists {#tutorial_documentation_md_list}
@verbatim Bulleted:
- item1
- item2 Numbered:
- item1
- item2 or -# item1 -# item2 @endverbatim
emphasis {#tutorial_documentation_md_emph}
@verbatim italic bold use html in complex cases: "path/to/file" @endverbatim
links {#tutorial_documentation_md_links}
@verbatim explicit link: OpenCV main site automatic links: http://opencv.org or even: http://opencv.org @endverbatim
images {#tutorial_documentation_md_image}
headers {#tutorial_documentation_md_head}
Level1
Level2
Level3
Level4
header id {#tutorial_documentation_md_headid}
You can assign a unique identifier to any header to reference it from other places. @verbatim
Header {#some_unique_identifier}
... See @ref some_unique_identifier for details @endverbatim
page id {#tutorial_documentation_md_page}
Each page should have additional Level1 header at the beginning with page title and identifier: @verbatim
Writing documentation for OpenCV {#tutorial_documentation}
tables {#tutorial_documentation_md_table}
Example from doxygen documentation: @verbatim First Header | Second Header ------------- | ------------- Content Cell | Content Cell Content Cell | Content Cell @endverbatim
Commonly used commands {#tutorial_documentation_quick_start_5}
Most often used doxygen commands are described here with short examples. For the full list of available commands and detailed description, please visit Command reference.
Basic commands {#tutorial_documentation_commands_basic}
brief - paragraph with brief entity description
param - description of function argument.
Multiple adjacent statements are merged into one list. If argument with this name is not found in actual function signature - doxygen warning will be produced. Function can have either no documented parameters, either all should be documented.
sa - "See also" paragraph, contains references to classes, functions, pages or URLs
note - visually highlighted "Note" paragraph. Multiple adjacent statements are merged into one block.
return, returns - describes returned value of a function
overload - adds fixed text to the function description: "This is an overloaded member function, provided for convenience. It differs from the above function only in what argument(s) it accepts."
anchor - places invisible named anchor, which can be referenced by
refcommand. It can be used in pages only.ref - explicit reference to a named section, page or anchor.
If such entity can not be found - doxygen warning will be generated. This command has an optional argument - link text.
Doxygen also generates some links automatically: if text contains word which can be found in documented entities - reference will be generated. This functionality can be disabled by prefixing the word with
%symbol. @verbatim Explicit reference: @ref MyClass Explicit named reference: @ref example_page "Example page" Implicit reference: cv::abc::MyClass1 or just MyClass1 Disable implicit reference: %MyClass1 @endverbatimf - formula
Inline formulas are bounded with
f$command: @verbatim \f$ ... \f$ @endverbatimBlock formulas - with
f[andf]commands: @verbatim \f[ ... \f] @endverbatim
Code inclusion commands {#tutorial_documentation_commands_include}
To mark some text as a code in documentation, code and endcode commands are used. @verbatim @code float val = img.at(borderInterpolate(100, img.rows, cv::BORDER_REFLECT_101),
borderInterpolate(-5, img.cols, cv::BORDER_WRAP));
Syntax will be highlighted according to the currently parsed file type (C++ for .hpp, C for .h) or you can manually specify it in curly braces:
@verbatim @code{.xml} @endverbatim
To include whole example file into documentation, include and includelineno commands are used. The file is searched in common samples locations, so you can specify just its name or short part of the path. The includelineno version also shows line numbers but prevents copy-pasting since the line numbers are included.
@verbatim @include samples/cpp/test.cpp @endverbatim
If you want to include some parts of existing example file - use snippet command.
First, mark the needed parts of the file with special doxygen comments: @verbatim //! [var_init] int a = 0; //! [var_init] @endverbatim
Then include this snippet into documentation: @verbatim @snippet samples/cpp/test.cpp var_init @endverbatim
@note Currently most of such partial inclusions are made with dontinclude command for compatibility with the old rST documentation. But newly created samples should be included with the snippet command, since this method is less affected by the changes in processed file.
Toggle buttons inclusion commands {#tutorial_documentation_toggle_buttons_commands_include}
Toggle buttons are used to display the selected configuration (e.g. programming language, OS, IDE).
To use the buttons in documentation, _addtoggle and _endtoggle commands are used.
The command _addtoggle can be
- general: _addtoggle{Button Name}
- for C++: _add_togglecpp
- for Java: _add_togglejava
- for Python: _add_togglepython
Example: @verbatim @add_toggle{Button Name}
text / code / doxygen commands
For example using toggle buttons with text and code snippets:
Buttons Example
Text for C++ button @snippet samples/cpp/tutorial_code/introduction/documentation/documentation.cpp hello_world
Text for Java button @snippet samples/java/tutorial_code/introduction/documentation/Documentation.java hello_world
Text for Python button @snippet samples/python/tutorial_code/introduction/documentation/documentation.py hello_world
Result looks like this:
Buttons Example
Text for C++ button @snippet samples/cpp/tutorial_code/introduction/documentation/documentation.cpp hello_world
Text for Java button @snippet samples/java/tutorial_code/introduction/documentation/Documentation.java hello_world
Text for Python button @snippet samples/python/tutorial_code/introduction/documentation/documentation.py hello_world
As you can see, the buttons are added automatically under the previous heading.
Grouping commands {#tutorial_documentation_commands_group}
All code entities should be put into named groups representing OpenCV modules and their internal
structure, thus each module should be associated with a group with the same name. Good place to
define groups and subgroups is the main header file for this module:
"/include/opencv2/.hpp".
@note Doxygen groups are called "modules" and are shown on "Modules" page. @verbatim
/**
@defgroup mymodule My great module @{ @}
*/
@endverbatim To put classes and functions into specific group, just add @verbatim
/** @brief Example function */
or
/**
@addtogroup mymodule_experimental
@{
*/
... several functions, classes or enumerations here
/**
@}
*/
@endverbatim Use cite command to insert reference to related publications listed in @ref citelist page. First, add publication BibTeX record into "/doc/opencv.bib" or
"/modules//doc/.bib" file:
@verbatim
@ARTICLE{Bradski98,
@note Try not to add publication duplicates because it can confuse documentation readers and writers later. Then make reference with cite command:
@verbatim
@cite Bradski98
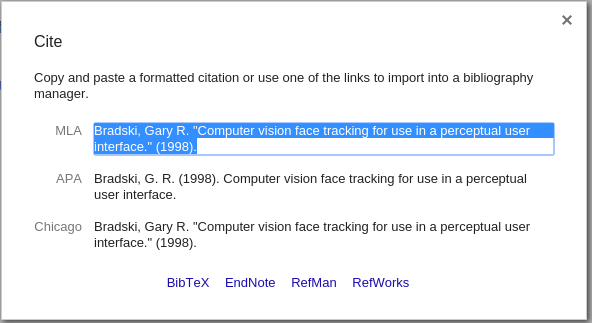
@endverbatim @note To get BibTeX record for the publications one can use Google Scholar. Once the publication
have been found - follow its "Cite" link and then choose "BibTeX" option:
Steps described in this section can be used as checklist during documentation writing. It is not
necessary to do things in the same order, but some steps really depend on previous. And of course
these steps are just basic guidelines, there is always a place for creativity. Formulate the idea to be illustrated in the tutorial. Make the example application, simple enough to be understood by a beginning developer. Be
laconic and write descriptive comments, don't try to avoid every possible runtime error or to make
universal utility. Your goal is to illustrate the idea. And it should fit one source file! If you want to insert code blocks from this file into your tutorial, mark them with special doxygen comments (see here). If you want to write the tutorial in more than one programming language, use the toggle buttons for alternative comments and code (see here). Collect results of the application work. It can be "before/after" images or some numbers
representing performance or even a video. Save it in appropriate format for later use in the tutorial: Create new tutorial page (".markdown"-file) in corresponding location (see
here), and place all image files near it (or in "images"
subdirectory). Also put your example application file and make sure it is compiled together with the
OpenCV library when Modify your new page: Describe your results, insert previously added images or other results. To add a youtube video, e.g. www.youtube.com/watch?v= ViPN810E0SU, use youtube{Video ID}:
@verbatim
@youtube{ViPN810E0SU}
@endverbatim Add bibliographic references if any (see here). Add newly created tutorial to the corresponding table of contents. Just find
"table_ofcontent*.markdown" file with the needed table and place new record in it
similar to existing ones. It is simply a list item with special subpage command which marks your page as a
child and places it into the existing pages hierarchy. Also note the list item indent, empty lines between
paragraphs and special italic markers. Generate doxygen documentation and verify results.optional description
@defgroup mymodule_basic Basic operations
    optional description
@defgroup mymodule_experimental Experimental operations
    optional description
ingroup command to its documentation,
or wrap the whole code block with addtogroup command:@ingroup mymodule
Publication reference {#tutorial_documentation_commands_cite}
author = {Bradski, Gary R},
title = {Computer vision face tracking for use in a perceptual user interface},
year = {1998},
publisher = {Citeseer}
Step-by-step {#tutorial_documentation_steps}
Document the function {#tutorial_documentation_steps_fun}
Write the tutorial {#tutorial_documentation_steps_tutorial}
-DBUILD_EXAMPLES=ON option is enabled on cmake step.
References {#tutorial_documentation_refs}