
threshold.markdown 7.9 KB
Basic Thresholding Operations {#tutorial_threshold}
@prev_tutorial{tutorial_pyramids} @next_tutorial{tutorial_threshold_inRange}
| | | | -: | :- | | Original author | Ana Huamán | | Compatibility | OpenCV >= 3.0 |
Goal
In this tutorial you will learn how to:
- Perform basic thresholding operations using OpenCV function @ref cv::threshold
Cool Theory
@note The explanation below belongs to the book Learning OpenCV by Bradski and Kaehler. What is
Thresholding?
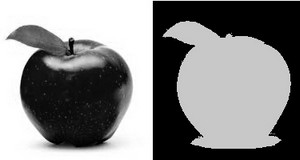
- The simplest segmentation method
- Application example: Separate out regions of an image corresponding to objects which we want to analyze. This separation is based on the variation of intensity between the object pixels and the background pixels.
- To differentiate the pixels we are interested in from the rest (which will eventually be rejected), we perform a comparison of each pixel intensity value with respect to a threshold (determined according to the problem to solve).
Once we have separated properly the important pixels, we can set them with a determined value to identify them (i.e. we can assign them a value of \f$0\f$ (black), \f$255\f$ (white) or any value that suits your needs).
Types of Thresholding
- OpenCV offers the function @ref cv::threshold to perform thresholding operations.
- We can effectuate \f$5\f$ types of Thresholding operations with this function. We will explain them in the following subsections.
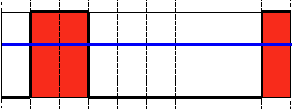
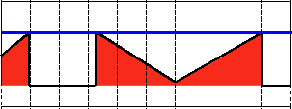
To illustrate how these thresholding processes work, let's consider that we have a source image with pixels with intensity values \f$src(x,y)\f$. The plot below depicts this. The horizontal blue line represents the threshold \f$thresh\f$ (fixed).

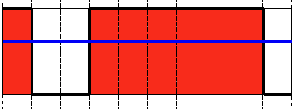
Threshold Binary
This thresholding operation can be expressed as:
\f[\texttt{dst} (x,y) = \fork{\texttt{maxVal}}{if (\texttt{src}(x,y) > \texttt{thresh})}{0}{otherwise}\f]
So, if the intensity of the pixel \f$src(x,y)\f$ is higher than \f$thresh\f$, then the new pixel intensity is set to a \f$MaxVal\f$. Otherwise, the pixels are set to \f$0\f$.
Threshold Binary, Inverted
This thresholding operation can be expressed as:
\f[\texttt{dst} (x,y) = \fork{0}{if (\texttt{src}(x,y) > \texttt{thresh})}{\texttt{maxVal}}{otherwise}\f]
If the intensity of the pixel \f$src(x,y)\f$ is higher than \f$thresh\f$, then the new pixel intensity is set to a \f$0\f$. Otherwise, it is set to \f$MaxVal\f$.
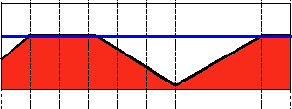
Truncate
This thresholding operation can be expressed as:
\f[\texttt{dst} (x,y) = \fork{\texttt{threshold}}{if (\texttt{src}(x,y) > \texttt{thresh})}{\texttt{src}(x,y)}{otherwise}\f]
The maximum intensity value for the pixels is \f$thresh\f$, if \f$src(x,y)\f$ is greater, then its value is truncated. See figure below:
Threshold to Zero
This operation can be expressed as:
\f[\texttt{dst} (x,y) = \fork{\texttt{src}(x,y)}{if (\texttt{src}(x,y) > \texttt{thresh})}{0}{otherwise}\f]
If \f$src(x,y)\f$ is lower than \f$thresh\f$, the new pixel value will be set to \f$0\f$.

Threshold to Zero, Inverted
This operation can be expressed as:
\f[\texttt{dst} (x,y) = \fork{0}{if (\texttt{src}(x,y) > \texttt{thresh})}{\texttt{src}(x,y)}{otherwise}\f]
If \f$src(x,y)\f$ is greater than \f$thresh\f$, the new pixel value will be set to \f$0\f$.
Code
@add_toggle_cpp The tutorial code's is shown lines below. You can also download it from here @include samples/cpp/tutorial_code/ImgProc/Threshold.cpp @end_toggle
@add_toggle_java The tutorial code's is shown lines below. You can also download it from here @include samples/java/tutorial_code/ImgProc/threshold/Threshold.java @end_toggle
@add_toggle_python The tutorial code's is shown lines below. You can also download it from here @include samples/python/tutorial_code/imgProc/threshold/threshold.py @end_toggle
Explanation
Let's check the general structure of the program:
- Load an image. If it is BGR we convert it to Grayscale. For this, remember that we can use the function @ref cv::cvtColor :
@add_toggle_cpp @snippet samples/cpp/tutorial_code/ImgProc/Threshold.cpp load @end_toggle
@add_toggle_java @snippet samples/java/tutorial_code/ImgProc/threshold/Threshold.java load @end_toggle
@add_toggle_python @snippet samples/python/tutorial_code/imgProc/threshold/threshold.py load @end_toggle
- Create a window to display the result
@add_toggle_cpp @snippet samples/cpp/tutorial_code/ImgProc/Threshold.cpp window @end_toggle
@add_toggle_java @snippet samples/java/tutorial_code/ImgProc/threshold/Threshold.java window @end_toggle
@add_toggle_python @snippet samples/python/tutorial_code/imgProc/threshold/threshold.py window @end_toggle
Create \f$2\f$ trackbars for the user to enter user input:
- Type of thresholding: Binary, To Zero, etc...
- Threshold value
@add_toggle_cpp @snippet samples/cpp/tutorial_code/ImgProc/Threshold.cpp trackbar @end_toggle
@add_toggle_java @snippet samples/java/tutorial_code/ImgProc/threshold/Threshold.java trackbar @end_toggle
@add_toggle_python @snippet samples/python/tutorial_code/imgProc/threshold/threshold.py trackbar @end_toggle
- Wait until the user enters the threshold value, the type of thresholding (or until the program exits)
- Whenever the user changes the value of any of the Trackbars, the function Threshold_Demo (update in Java) is called:
@add_toggle_cpp @snippet samples/cpp/tutorial_code/ImgProc/Threshold.cpp Threshold_Demo @end_toggle
@add_toggle_java @snippet samples/java/tutorial_code/ImgProc/threshold/Threshold.java Threshold_Demo @end_toggle
@add_toggle_python @snippet samples/python/tutorial_code/imgProc/threshold/threshold.py Threshold_Demo @end_toggle
As you can see, the function @ref cv::threshold is invoked. We give \f$5\f$ parameters in C++ code:
- src_gray: Our input image
- dst: Destination (output) image
- threshold_value: The \f$thresh\f$ value with respect to which the thresholding operation is made
- max_BINARY_value: The value used with the Binary thresholding operations (to set the chosen pixels)
- threshold_type: One of the \f$5\f$ thresholding operations. They are listed in the comment section of the function above.
Results
-# After compiling this program, run it giving a path to an image as argument. For instance, for an
input image as:

-# First, we try to threshold our image with a binary threshold inverted. We expect that the
pixels brighter than the \f$thresh\f$ will turn dark, which is what actually happens, as we can see
in the snapshot below (notice from the original image, that the doggie's tongue and eyes are
particularly bright in comparison with the image, this is reflected in the output image).

-# Now we try with the threshold to zero. With this, we expect that the darkest pixels (below the
threshold) will become completely black, whereas the pixels with value greater than the
threshold will keep its original value. This is verified by the following snapshot of the output
image:
